
Control Panel Overview
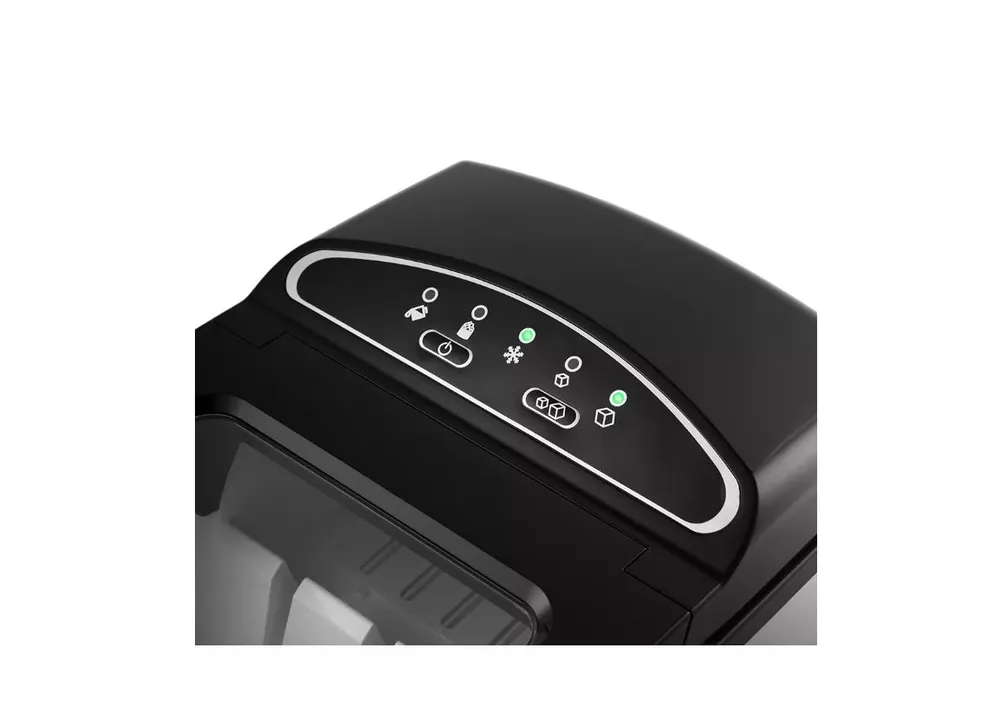 Kitfort KT-1807 control panel layout (buttons and indicator lights)
This ice maker has a simple top-mounted control panel (see image above). It includes two buttons (On/Off and Select) and several indicator lights for status. The On/Off button starts or stops the ice-making process, while the Select button lets you choose the ice cube size. The indicator lights labeled Add Water, Ice Full, Power, and S/L (small/large) show the machine’s status at a glance. Below is a summary of each control and indicator:
- On/Off Button – Turns the ice maker on or off. Press this button to start ice production; press it again to stop (or to power down the unit when not in use).
- Select Button (Ice Size) – Toggles the ice cube size between Small and Large. Press this button to choose the desired ice size. The corresponding “S” (small) or “L” (large) indicator will light up to show which size is selected.
- Power Indicator – Shows the power/status of the ice maker. This light comes on (usually green) when the machine is turned on and actively working. (On some units, it may blink in standby mode and stay solid while ice is being made.)
- Ice Full Indicator – Lights up (usually red) when the ice basket is full of ice. This alerts you that the ice storage basket has reached capacity. When this indicator is on, the machine will pause ice production until you remove some ice.
- Add Water Indicator – Lights up (red) when the water level in the reservoir is low or empty. This warning means the machine has stopped making ice due to insufficient water. You should add water to the reservoir to resume operation (see steps below).
Operating Instructions
Follow these step-by-step instructions to operate your Kitfort KT-1807 ice maker:
- Position the Ice Maker: Place the machine on a stable, level surface indoors, near an electrical outlet. Make sure there is some space around it for ventilation (for example, leave a few inches/centimeters clearance on each side and above). Avoid placing it under direct sunlight or next to heat sources. Ensure the drain plug (located at the bottom of the unit) is closed securely before filling with water.
-
Add Water to the Reservoir: Open the top lid and remove the ice basket. Locate the water reservoir beneath the basket. Fill the reservoir with clean drinking water up to the “MAX” fill line. Do not overfill – the water level should be below the bottom of the ice basket (there is usually a max line or marker inside the reservoir). For best results, use cool or room-temperature potable water (not hot). Using filtered or distilled water can help produce clearer ice and reduce mineral build-up. After filling, place the ice basket back into the unit and close the lid.
-
Power On: Plug the ice maker into a proper wall outlet. Press the On/Off button to turn on the machine and start the ice-making cycle. The Power indicator should illuminate, indicating the unit is running. You may hear the compressor and water pump begin to operate. (If the machine was just plugged in, the Power/Status light might blink for a few moments, then turn solid once the cycle starts.)
-
Select Ice Size: By default, the machine may start with a preset ice cube size (often Small). To choose your preferred ice size, press the Select button. Each press toggles the size – the “S” (small) or “L” (large) indicator will light up accordingly. Select Small ice for slightly thinner, faster-freezing cubes, or Large for thicker cubes. (Tip: In very cold room conditions, choosing Small can prevent cubes from sticking together.)
-
Ice Making Process: Once turned on and filled with water, the KT-1807 will begin producing ice automatically. Each ice-making cycle typically takes about 7–13 minutes (the exact time can vary depending on the selected size and ambient temperature). During a cycle, water is pumped over the freezing prongs (evaporator rods) to form ice. You do not need to do anything during this process – ice will form and then drop into the basket on its own. The first batch of ice cubes might be small or slightly wet, which is normal; subsequent batches will be more consistent as the machine cools up to optimal temperature.
-
Collecting Ice: Ice cubes will accumulate in the removable ice basket under the lid. You can periodically open the lid to check the ice. Use the provided ice scoop to take out ice as needed and serve. It’s a good idea to transfer ready ice to your freezer if you want to store it, since the machine’s basket is not refrigerated (the ice will slowly melt if left there, recycling back into the water reservoir).
-
Automatic “Ice Full” Stop: The machine will continue making ice until the ice basket is full. When the basket can’t hold any more ice, an infrared sensor will detect this and the Ice Full indicator will light up. At that point, the ice maker will automatically pause production to prevent overfilling. When you see the Ice Full light on, open the lid and empty the ice basket (remove some or all of the ice). You can simply lift out the basket to dump the ice into a bowl or freezer, or use the scoop to remove ice. After clearing out some ice, place the empty basket back into the machine and close the lid. The Ice Full light should turn off and the unit will resume making ice automatically after a short delay (you may not need to press anything to restart).
-
Low Water Alert: If the water level in the reservoir runs low during operation, the ice maker will detect this and stop making ice. The Add Water indicator will turn on to alert you that the machine needs more water. When this happens, open the lid and remove the ice basket to access the reservoir. Add water to the reservoir again (up to the MAX fill line). After refilling, press the On/Off button to restart the ice maker. The Add Water light should go off and ice production will resume. (For safety of the compressor, wait about 2-3 minutes after adding water before turning the machine back on, to allow the refrigerant to settle.)
-
Stopping Operation: To pause or stop ice making at any time, press the On/Off button. The machine will stop the cycle and go into standby mode. The Power/Status light may blink, indicating it’s powered but not producing ice. If you intend to stop for only a short time (for example, to clean or refill water), you can restart the cycle by pressing On/Off again when ready. If you are finished using the ice maker for the day, turn it off and unplug it from the outlet.
-
Daily Use Tips: For freshest ice, it’s recommended to replace the water in the reservoir if it has been sitting for more than 24 hours. Simply turn off and unplug the unit, then drain old water (see Cleaning section below) and refill with fresh water. This ensures the ice doesn’t pick up any stale taste. The KT-1807 is designed to be fully automatic – it will manage the ice production cycles, stopping when full or when water is low, and restarting when conditions are correct. You don’t need to constantly monitor it, but do check the indicator lights occasionally.
-
After Use: When you’re done making ice, turn the machine off (if it’s not already off from an “Ice Full” or “Add Water” pause). Transfer any remaining ice to your freezer or an ice chest if you want to keep it, as it will melt over time in the machine. It’s a good practice to empty the water reservoir and dry the machine if it won’t be used again soon – this prevents stagnant water or mildew. Always unplug the ice maker before cleaning or when not in use.
Cleaning and Maintenance
Regular cleaning will keep your ice maker running efficiently and ensure your ice tastes fresh. Below are instructions for cleaning and maintaining the Kitfort KT-1807:
- Turn Off and Unplug: Before cleaning, make sure the ice maker is turned off. If it was recently making ice, press the On/Off button to stop the cycle. Then unplug the power cord from the outlet. It’s important to disconnect power for safety whenever you clean the unit. Allow the ice maker to sit for a few minutes so any remaining ice can melt and the interior can come to room temperature (this prevents damage and makes cleaning easier).
-
Drain any Remaining Water: If there is water left in the reservoir (or any melted ice), you’ll need to drain it out. The KT-1807 is equipped with a drain plug on the bottom (typically underneath the unit). Place the ice maker near a sink or position a shallow container/basin under the drain outlet. Gently pull out the rubber or plastic drain plug to let the water empty out. Tip the machine slightly if needed (carefully) to ensure all water drains. Once the reservoir is empty, put the drain plug back in place securely to prevent leaks during subsequent use.
-
Remove the Ice Basket: Open the lid and take out the ice basket. Dump out any ice left in it. You will want to clean the basket separately. (Also remove the ice scoop if it was stored inside.)
-
Clean the Interior: Prepare a mild cleaning solution. You have two options:
– Vinegar Solution: Mix equal parts of warm water and white vinegar (1:1 ratio). This helps dissolve mineral deposits and sanitize the interior.
– Mild Detergent Solution: Mix a few drops of dish soap with warm water. (This is gentle and good for general cleaning, but be sure to rinse thoroughly afterward to remove any soap residue.)
Dip a soft cloth or sponge into your cleaning solution. Wipe down all interior surfaces of the ice maker, including the water reservoir, the underside of the lid, the metal evaporator prongs (the freezing rods where ice forms), and the walls of the interior. Do not use abrasive cleaners, steel wool, or harsh chemicals, as these can scratch or damage the appliance. Stubborn mineral scale or slime can be removed by letting the vinegar solution sit on the surface for a few minutes before wiping.
- Rinse Interior Surfaces: After cleaning with soap or vinegar, rinse the interior by wiping it again with a cloth dampened in plain clean water. This removes any cleaner or vinegar taste. It’s important especially if you used detergent, to ensure no soap remains. Once rinsed, use a dry soft cloth to thoroughly wipe and dry the inside of the reservoir and all interior parts. Leave the lid open for a short while to air-dry any moisture if needed. (Make sure the evaporator prongs and sensors are dry before next use.)
-
Clean the Ice Basket and Scoop: Wash the removed ice basket and the ice scoop with warm water and a bit of mild dish soap. Rinse them well with clean water to remove soap. Dry both items completely with a towel. These parts are not dishwasher-safe, so hand washing is recommended. Ensuring they are clean will keep your ice sanitary.
-
Clean the Exterior: Wipe the outside of the ice maker with a soft damp cloth. You can use a little mild detergent or a vinegar-water solution on the cloth if the exterior has stains or sticky spots – for example, a mild soapy water solution works well on the stainless steel and plastic housing. Do not use abrasive pads on the outer surfaces to avoid scratches. After wiping with a damp cloth, go over it again with a clean water-dampened cloth to remove any soap, then dry the exterior with a soft towel. Take care not to get excess water into any vents or openings.
-
Check the Vent and Sensors: As part of maintenance, make sure the side/back ventilation fan grille is free of dust or lint. You can gently vacuum it or wipe it with a dry cloth to ensure proper airflow. Also, inside the unit near the ice basket, there may be small infrared sensor lights (these detect “ice full”). Make sure these sensor areas are clean and not obscured by dirt or scale – wipe them gently if needed when cleaning the interior.
-
Reassemble: Double-check that you have put the drain plug back in securely after draining. Place the clean ice basket and scoop back into the unit (or store the scoop separately). Keep the lid open for a while to let everything dry completely if you’re not using the machine immediately.
-
Storage and Long-Term Maintenance: If you do not plan to use the ice maker for an extended period:
– Make sure all water is drained from the reservoir and the unit is completely dry (to prevent mold or mildew).
– Store the appliance in a cool, dry place. It’s a good idea to leave the lid ajar (or off) during storage so air can circulate inside, which prevents odors.
– Keep it out of reach of children when stored.
– When you take it out of storage for use, rinse the water reservoir with fresh water and maybe run a cleaning cycle again before making ice, especially if it’s been sitting for a long time.
- Maintenance Schedule: For best performance and hygiene, clean the water reservoir and interior about once a week if you use the machine regularly. Also, replace the water with fresh water daily or every 24 hours if continuous use, so that your ice is always made from clean water. Regular cleaning prevents mineral build-up from hard water, ensures sensors work correctly, and keeps ice tasting good.
By following these operating and cleaning instructions, you’ll ensure your Kitfort KT-1807 ice maker works smoothly and produces clean, great-tasting ice. Enjoy your ice making, and remember to keep an eye on the indicator lights – they will tell you when attention is needed, making this ice maker very convenient to use. Cheers to cold drinks!